


- Access the WordPress Dashboard: Log in to your WordPress site and access the dashboard.
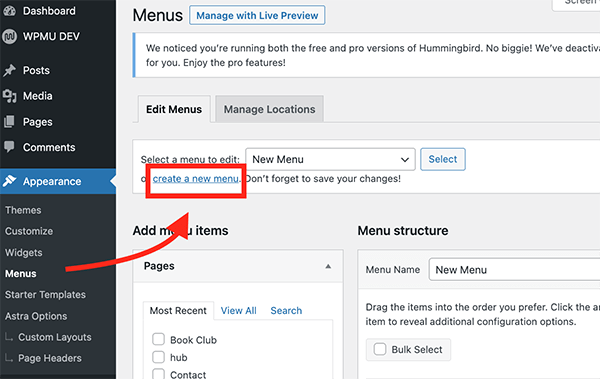
- Navigate to the Menu Settings: In the dashboard, go to “Appearance” and then click on “Menus” in the left sidebar.
- Create a New Menu: If you don’t have a menu yet, click on “create a new menu” link. If you already have a menu, you can edit that.
- Add Menu Items: To add items to your menu, you can select from different options including Pages, Posts, Custom Links, and Categories. You can choose the items you want to add and then click on the “Add to Menu” button.
- Create Sub-Menus: To create a sub-menu, you can drag the menu item slightly to the right under the main menu item. This action will indent the item slightly, indicating that it’s a sub-menu item.
- Configure Menu Settings: You can configure the menu settings as per your requirements. You can set the menu location, edit the menu structure, and choose the display location of the menu.
- Save the Menu: Once you have created the desired menu structure, click the “Save Menu” button to save your changes.
- Assign the Menu to a Location: After saving the menu, you need to assign it to a location. Depending on your theme, you may have different menu locations, such as a primary menu location, a footer menu location, or a header menu location. You can choose the desired location for your menu from the options provided.
- Preview the Changes: You can preview the changes on your website to ensure that the menu and sub-menu items are displaying correctly.
Using the above steps, you can easily create menus and sub-menus in WordPress to organize your site’s navigation and improve user experience.

Author: shadjavist
Humble gentleman who never believes in impossibility


One thought on “How to create Menus and Submenus in wordpress.”